What to Expect During an Open Trench Utility Installation: A Step-by-Step Guide for Roseville Homeowners
March 17, 2025 7:03 pm Leave your thoughtsIf you’re a homeowner in Roseville, California, and are considering or about to undergo an open trench utility installation, you might be wondering what to expect. Whether you are upgrading your water lines, installing a new gas line, or any other utility service, the open trench method is a common procedure. It’s important to understand the open trench installation process so you can prepare your property, understand potential disruptions, and make the experience as smooth as possible. This step-by-step guide is designed to walk you through the process, providing clarity on what homeowners can expect during the project.
Understanding Open Trench Utility Installation
The open trench method is one of the most traditional ways of laying down utility lines. This method involves digging a trench along the path where the utility will be installed, whether it’s for water, gas, electricity, or sewer systems. Unlike modern trenchless technology, which avoids extensive digging, open trench installations require more significant excavation. In Roseville, utility projects of this nature are typically necessary when utilities need to be replaced or newly installed.
While it may seem like a daunting process, understanding the steps involved can help ease concerns. Typically, this type of installation is needed for major utility upgrades, repairs, or when new services are being introduced into a neighborhood or home. The open trench installation process is often chosen because it allows contractors easy access to the utility lines, ensuring they can work efficiently, especially when dealing with older or more complex systems.
Step 1: Preparation and Permitting
Before any digging begins, preparation is a key phase in the open trench utility installation process. For homeowners in Roseville, this means that you’ll likely be contacted by the utility company to inform you about the upcoming installation. During this time, contractors will assess the work site to determine the best route for the trench, considering factors like existing structures, landscaping, and potential underground obstacles.
One of the first things to expect is the permitting process. Before any construction work begins, your utility company or contractor will need to secure the appropriate permits from the local government. In Roseville, this may involve submitting plans that outline the scope of the work, including where the trench will be dug and how long the project will take. This step also involves ensuring that no existing underground utilities are damaged during the excavation. The contractor will have to call the local “811” service to mark any existing utility lines such as water pipes, gas lines, or cables.
Once all permits are approved and the necessary markings are in place, the project can begin. Homeowners should be ready for some initial disruption, as contractors might need to mark their property with spray paint or flags to indicate where the trench will run. This is typically a visual step, with limited impact on your daily life. However, it does signal that the open trench utility installation process is set to begin.
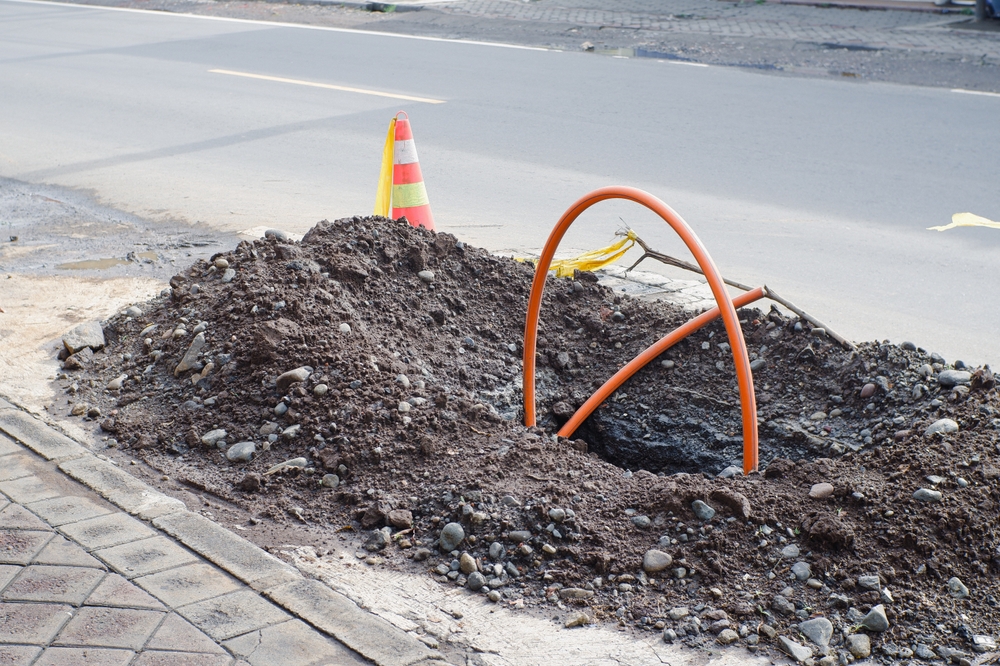
Step 2: Excavation and Trench Digging
The second step in the open trench utility installation process is the actual excavation or trench digging. During this stage, a backhoe or other heavy machinery will be used to dig a trench along the designated path. The trench’s depth and width depend on the type of utility being installed and the local regulations in Roseville.
For homeowners, this phase can be one of the more disruptive stages. The machinery will need space to maneuver, which may mean limited access to your driveway or yard. Expect to hear the sound of heavy equipment as the trench is being dug. The contractor will likely take extra precautions to protect your property, but some inconvenience is unavoidable. Additionally, if the installation is happening near your home, be prepared for the possibility of dust and dirt accumulating around your property.
The trench will be dug with precision, ensuring that there’s enough room for the installation of pipes, wires, or other utility components. This stage can take several hours to a few days depending on the scope of the project. It’s important to note that the length of time will vary depending on several factors, such as the size of the trench, soil conditions, and any unforeseen obstacles (like tree roots or rocks) that might be encountered along the way.
During the excavation, there may also be temporary roadblocks or detours for traffic, particularly if the trench crosses a street or public right-of-way. Homeowners should expect some traffic delays, and it’s always a good idea to stay in communication with the contractors to stay updated on any changes to the timeline or potential disruptions.
Step 3: Installation of Utility Lines
Once the trench is dug and the site is prepared, the next phase of the process is the installation of utility lines or systems. Depending on the type of utility being installed, this may involve laying down new pipes, cables, or wires. For example, if the project involves a water line replacement, workers will place the new pipe carefully within the trench and secure it in place. The installation may also include installing other components, such as valves, connectors, or junction boxes, depending on the specifics of the utility system.
At this point in the process, homeowners in Roseville may notice more activity in and around the trench. Contractors will carefully lay the utility lines, ensuring that everything is aligned properly and securely. The work performed during this phase is critical, as proper installation ensures that the utility system will function effectively once the project is completed.
While this part of the installation is happening, contractors may test the utility systems to ensure everything is functioning as it should. For example, if it’s a gas line installation, there may be pressure tests to ensure there are no leaks. If it’s a water line, there may be a flow test to check for any potential issues. The testing is essential for making sure that everything works according to specifications and meets local building codes.
Step 4: Backfilling the Trench
After the utility lines have been installed, the next step is to backfill the trench. This involves filling the trench with dirt and soil to cover the newly installed utilities. The backfilling process is crucial because it ensures that the trench is safely closed and that the newly installed utilities are securely covered. It also helps to restore the property to its original state, as much as possible, after the excavation.
During this stage, homeowners may notice some final disruptions as equipment is used to backfill the trench. If the project is taking place in a yard or driveway, there might be some temporary issues with access, though the area will be cleaned up after the backfilling is complete. The contractors will also smooth out the ground and compact the soil to prevent settling in the future.
Once the trench is backfilled, the site may still look a bit uneven until the final grading is done. In some cases, the contractors will also apply a temporary surface to stabilize the area, particularly if the trench crosses a driveway or a public right-of-way. Homeowners can expect the area to look much more finished after the backfilling stage, with most of the disruption behind them.
Step 5: Final Inspection and Cleanup
The last step in the open trench utility installation process is the final inspection and cleanup. This is when contractors and local authorities will inspect the work to ensure that everything has been done according to plan. The inspection includes checking the utility lines for proper installation, confirming that the trench has been correctly backfilled, and ensuring that no safety issues remain.
Once the inspection is completed and the project passes all required checks, the contractors will begin cleaning up the worksite. This includes removing any debris, packing away equipment, and making sure that the area is returned to its original state as much as possible. Homeowners can expect a cleaner, more organized property after this phase, with the trench filled in and the equipment gone.
For homeowners in Roseville, it’s essential to ensure that everything is properly cleaned up to avoid long-term issues like uneven ground or landscaping damage. While the open trench installation process can be disruptive, the final inspection and cleanup are critical steps that leave you with a safe, functioning utility system and a restored property.
Conclusion
An open trench utility installation, while necessary, can be a significant project for homeowners in Roseville. Understanding the open trench installation process can help you anticipate what to expect, minimize inconvenience, and ensure the work goes smoothly. From preparation and permitting to excavation, installation, backfilling, and final inspection, each step plays a vital role in delivering a safe and functional utility system. By staying informed and communicating with your contractors, you can make the experience as seamless as possible while ensuring your new utility service is installed to the highest standards.
Need Directional Drilling in Roseville, CA?
Locally owned and operated since 2000, we strive to provide fast, friendly, and efficient service to the residents of Roseville and its surrounding areas. Using an open trench method for installation, we work with communication and utility companies to get electric, water, and gas services up and running in your home or business as quickly and carefully as possible. Es7 Comm-2 U, Inc is proud to carry an ‘A+’ rating with the Better Business Bureau as a fully licensed general contractor. Call us today to ensure that your next installation project is handled with the care and professionalism that it deserves.
Categorised in: Trenching Contractors, Utility Contractor
This post was written by admin